
We don’t have running water at our property yet, and I’m not sure we’re going to bring it across the pond anyway—our Morton building is southeast of our pond, and our house site is northwest of our pond. What we do have is more than 3,000 square feet of relatively debris-free metal roof area at our disposal.
We have been working on this project for more than two years, and we’re excited to finally share it with you. Originally, when we discussed rain water collection for food plot irrigation, we envisioned one large tank, off the south side of the building, below grade. However, once we started thinking about cost, maintenance, ease of operation, and a whole host of other considerations, we realized there was a better way.
We wanted a system we could do ourselves, something economical, something we could disguise as to not create an eyesore, and something we could easily maintenance over time. That’s when we decided to utilize intermediate bulk container (IBC) totes. Most people aren’t familiar with the name, but they are familiar with the image.

IBC totes are commonly used in commercial operations to transport and use large volumes of predominantly liquids. We realized we could put them in series along the south side of our Morton building (where the gutter downspouts are located) where they would be relatively out-of-sight but still be accessible. The system would be rigged in such a way where the totes would collect water in the spring, summer, and fall but flow would be diverted back to the traditional downspouts in winter to protect the system from freezing temperatures. Each tote could be isolated for easy maintenance, repair, or replacement, and weather resistant covers would block light to the totes, reducing algae growth within them.

A few cold calls resulted in getting our first four food-grade IBC totes for free (that was in July of 2023). They each had a few gallons of organic cooking oil leftover inside, which we emptied and power-washed clean. We moved them to our Morton and utilized one for water storage to keep newly planted trees on a strict watering schedule.

Our entire rain water collection plan involved 18 IBC totes—12 along the south wall of our Morton building and another six along the east edge of our planned food plot. The east side of the future garden has the highest elevation, so water storage along that side would allow us to water everything by gravity. The 12 totes at the building would collect the water, and we’d transport that water into the six garden holding tanks with a simple pump.
I’m sort of getting ahead of myself. Before any of that could happen, we had to first build the infrastructure to support the totes. While we eventually wanted 12 totes along the building, at that time we only had six. How did we get to six from the original four? Great story. A couple of our cousins work in trucking and transport all kinds of stuff all over. They know everybody and are willing to help anybody. We happened to mention our plans at a family Thanksgiving, and three months later (February 2024)—out of the blue—a cousin called to say he had a couple free IBC totes from Kellogg’s for us in the back of his truck. We picked them up a few days after that only to discover they had once contained Fruit Loops syrup. They smelled AMAZING! We power washed them out, but they had far less remnants than the oil containers from before. Despite the cleaning, these two new totes still have that beautiful scent; we crave cereal every time we walk by them in the building.
Anyway, we want all the totes to act as one, large reservoir, but they don’t all have to be supported as one. We could’ve just thrown some patio pavers down on the ground, set the totes on them, and away we go, but you know us; we thought everything through and wanted to make it as user friendly as possible. We wanted the totes to be elevated off the ground to protect them from the elements and protect ourselves from both frustration and eventual arthritis. If our totes sat at ground level, we couldn’t fill buckets from them, we’d have to get down to the ground every time we wanted to access them, and we’d have muddy, dirty covers from splashing rain.
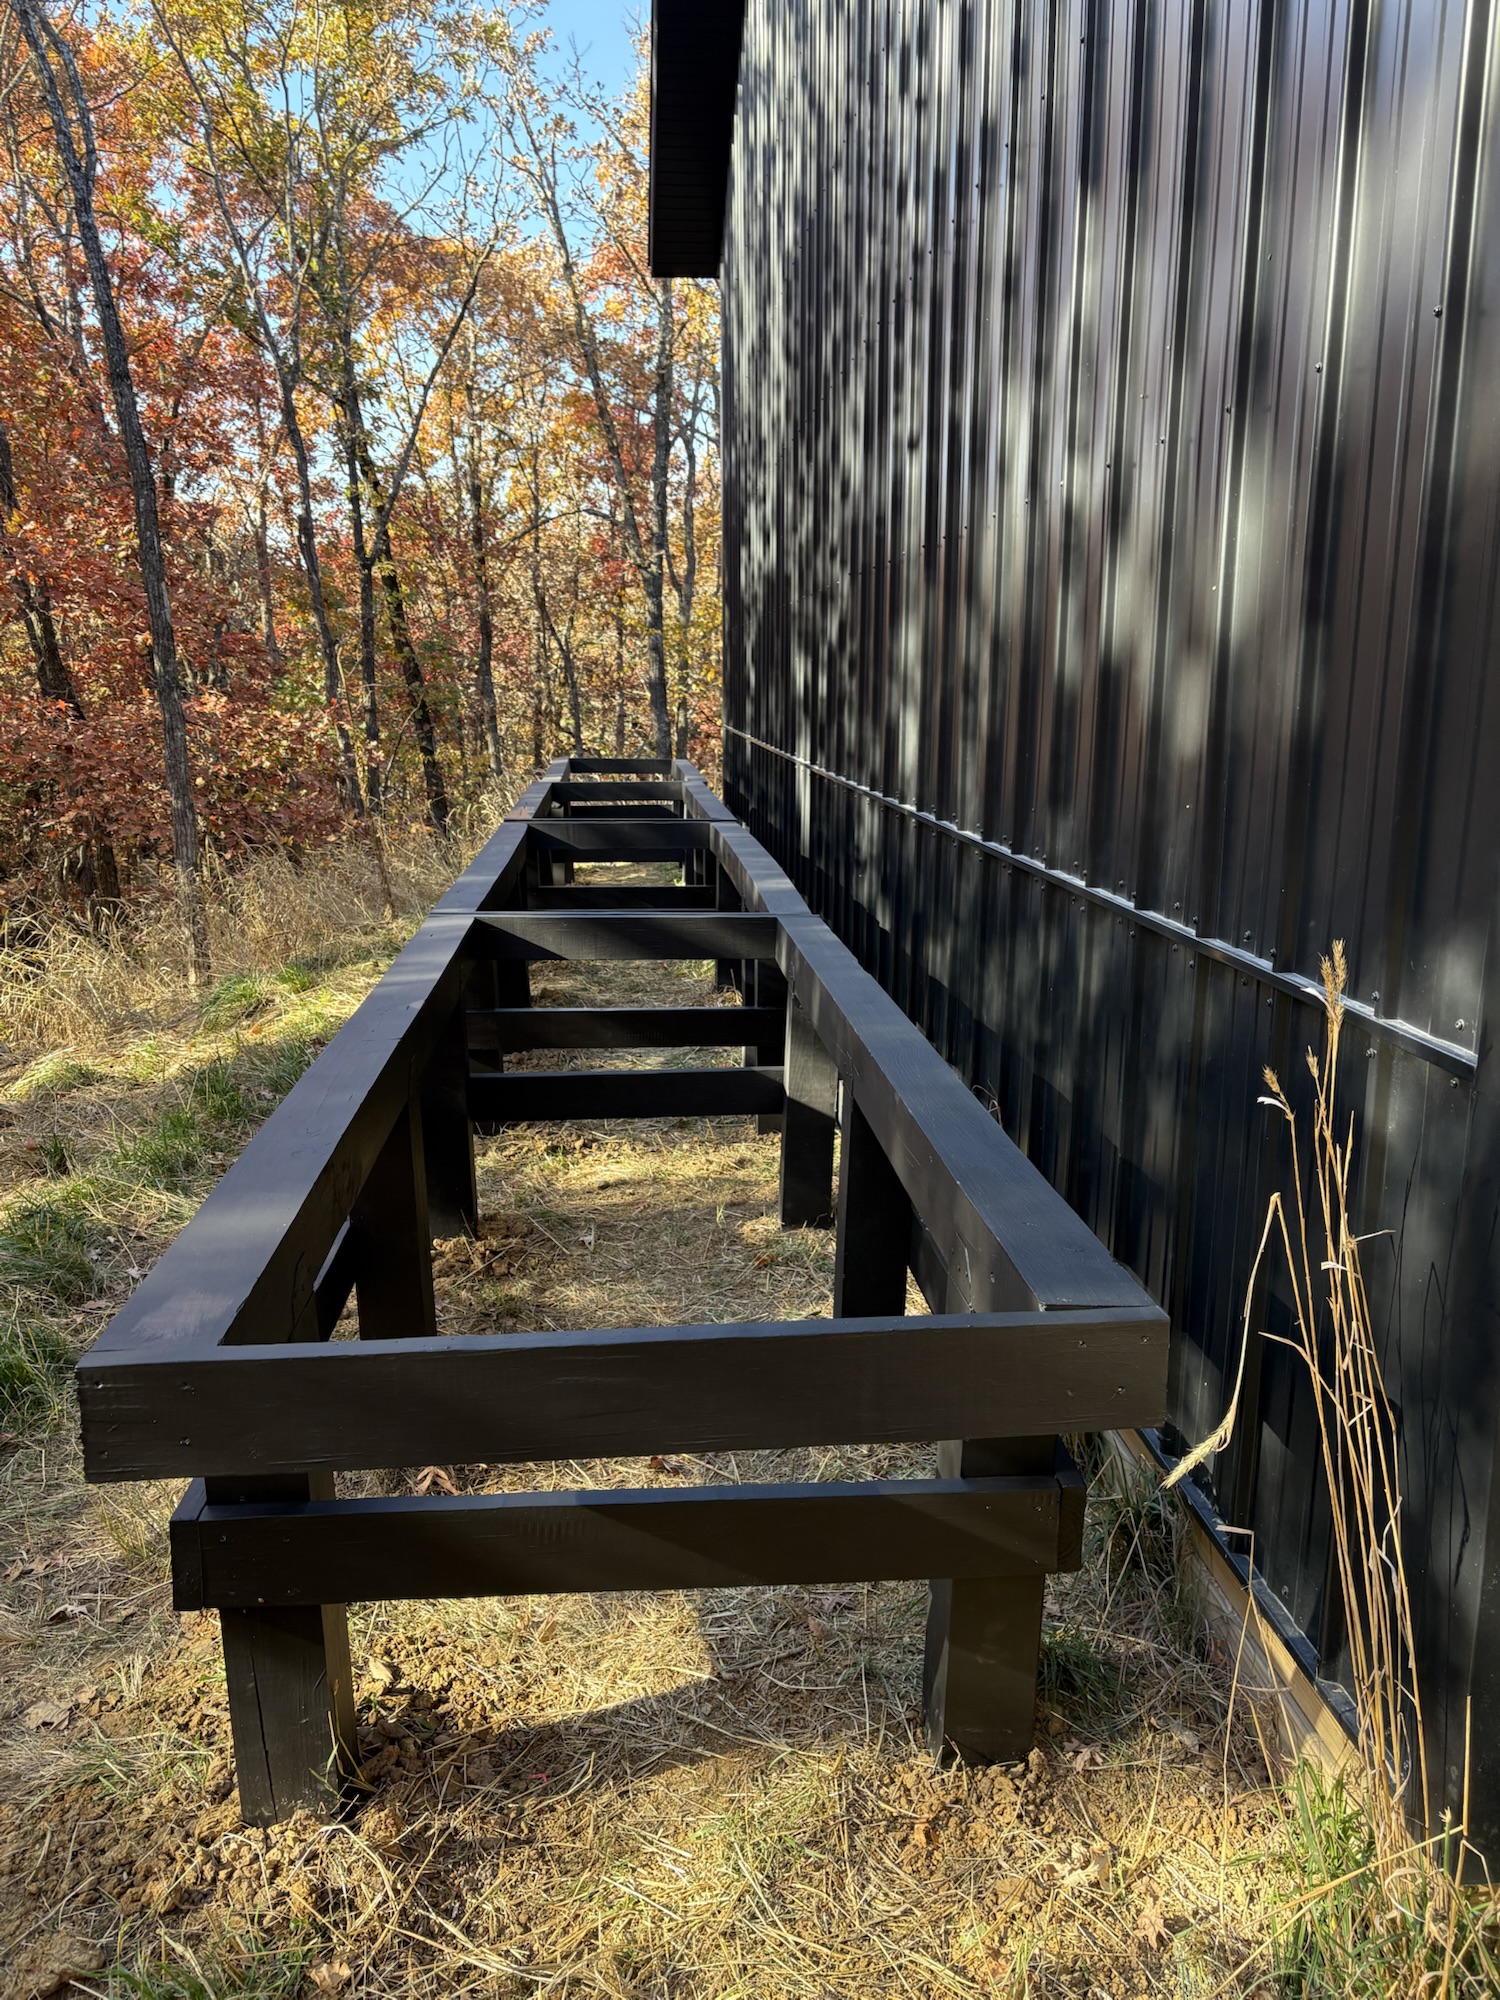
Instead, we opted to build four racks, each to hold three totes, roughly three feet off the ground. This would allow us to access and maintenance the totes comfortably while standing, keep them clean, permit our prairie to continue growing underneath, and easily fill buckets or pump water to another location from them. Ease of operation. Win, win, win, win.

A lot went into the planning for these racks. We needed some weather resistance, being outdoors in Iowa year-round. We needed durability, because three 275-gallon IBC totes full of water would weigh approximately 6,800 pounds…that’s more than three tons! We also needed some aesthetics, because—let’s face it—that matters to us. And we needed some help, because we don’t know everything.
We consulted my dad who has experience overbuilding things. I mean that in the best possible way. We respect going above and beyond; we do that for our patients. The home builder we’ve hired frequently describes what he does as “probably overkill.” We value that. We want to do things once, the best way and never have to redo them again (basically). Anyway, my dad has built stands for fish tanks—simple and relatively lightweight structures that can support a lot of weight—which is very similar to what we were trying to do here. We also consulted people on the internet, because they always know what they’re doing too, right? Kidding, kidding.
We went with 6 x 6 pressure treated posts and 2 x 6 bracing. Of course, with the pressure treatment, the lumber was still wet when we purchased it, and we knew it would shrink (and potentially warp) as it dried. So we created a drying rack out of the lumber itself. We started with the smaller pieces, as those would be the most likely to warp as they dried. We left spaces between the pieces and then made double-thick cardboard shims to place on top before the next layer. We continued on with the pattern, moving up to the largest, heaviest pieces at the end. We purchased the lumber in April of 2024 and let them dry for more than five months before cutting and painting them. Apparently, pressure treated lumber is dry enough to accept paint when the surface absorbs water. In the name of transparency, the five plus months was probably not required; we could have proceeded a month or few earlier, but as you know, we’ve had a lot of other projects going on simultaneously.

In September 2024, we finally fired up the generator, cut all the lumber into our predetermined lengths, and began priming all the pieces.

Then, we had to mow down the grasses on the south side of our building; we had quite the prairie growing over there…about 4-6 feet tall.

Once we had the area mowed, we measured out and marked where each of the 24 posts (6 posts/legs per each of the 4 racks/tables) would go. And when I say that, what I actually mean is: we followed my incredibly detailed, pre-calculated map down to the decimal.

Then, we rented an auger—a couple times—to help us dig all those post holes.

Anyway, we made sure to put the factory ends of all the 6 x 6 x 8 posts into the ground, as those received more of the chemical treatment and would be more resistant to rot. The row of posts closest to the building were set 12-18” below ground level, while the row of posts furthest from the building were set 24-30” below ground. We added bracing around all the bases and used exterior latex barn and fence paint because of that whole aesthetics thing. We ended up with a sturdy, durable, attractive, and relatively economical base for our rainwater collection operation at a comfortable working height.
Ok, so that brings us back to the actual collection of said rainwater. In the spring of 2025, we finally moved the totes into place.

To keep our IBC totes protected from the elements and algae growth to a minimum, we used black, UV-blocking tote covers to complete the look. They have easy access points for the inflow and outflow ports and blend in with our building.

We decided to first plumb the totes together to act as a single, large reservoir. If we diverted the downspouts first, they each would only collect into one tote.
Here’s where things got a little more interesting. Not all eighteen of our IBC totes were the same; that would’ve been too easy. No, their outlets had different threads. Thanks to Amazon’s free returns and easy drop off locations, I eventually found the right fittings for all the totes. For what it’s worth, six of our totes had “coarse threads;” that seems to be the easiest and most prevalent setup for which to find fittings. The other twelve had “fine threads,” but let me just tell you, there are a lot of different variations that fall within that category. Luckily—in my case—ten of those fine threaded IBC tote outlets were the same standard PVC threads, while the last two were of the 2.44” variety.
Are you wondering what the heck happened here? You should be. How did we go from six totes to eighteen? Well, that’s another great story. You remember the cousins who found us the Fruit Loops totes? Well, they called us out of the blue (again) and said they dropped off some stuff to a farmer, saw a bunch of IBC totes stacked on the farm, and inquired what he does with them. The farmer said he tries to give them away but always has a bunch. We gave him a call, asked for twelve, borrowed a friend’s truck and trailer and picked up the totes a few days later in June of 2024. These were no Fruit Loop containers, but they also came from Kellogg’s and held some sort of sugar/honey solution. Between these 12 containers and the six previous ones, we now had all 18 totes to complete our planned collection operation AND our future garden watering stash. These food-grade containers were all acquired for free over the course of a year.

Ok, so here’s the big reveal!

Alright, back to the technical stuff. For the coarse threaded totes: from the outlet, I plumbed a female coarse IBC tote thread to 2” male NPT (National Pipe Tapered Thread) adaptor to a schedule 40 2” female NPT to female S adaptor. I have some explaining to do, I know. The threaded PVC fittings come in either tapered threads or straight threads. The tapered threads are perfect to create water-tight seals with just some Teflon tape.

Remember, I want to be able to isolate and remove each tote for maintenance or replacement with relative ease. Ok, back to the explaining. Schedule 40 means high strength; they’re used outdoors in high pressure applications like sprinklers and pools. The “S” in “female S adaptor” means slip fittings. If “T” is threaded, “S” is slip; think regular, smooth PVC pipe you’re used to.

For the 2.44” fine threaded IBC totes, I had one extra adaptor to squeeze in, which is most simply a 2.44” fine thread IBC to coarse thread IBC adaptor. These, I could only get in a whole tote-to-hose spigot kit, but I finally found them, nonetheless.

The easiest conversion of all were the ten totes with NPT compatible spigots. Those only required the NPT to S adaptor.

I want to pause here and say there are probably dozens of different ways to do this, but this is just how I chose to do it. Moving on. Now that I had all 18 totes matched to a standard 2” slip fitting from their differing threads, things got a lot easier.
From each tote’s slip fitting adapter, a short section of pipe to flexible connector to pipe was installed. The sole intended purpose of these sections was to be able to isolate (and remove) each individual tote; however, they also ended up helping the plumbing manifold accommodate the different angles at which the tote outlets were projecting. Win, win. The other PVC connections are made permanent with PVC cement, but these flexible connectors are adjustable and removable.

From this point, tees, and elbows connected sections of pipe together in one, long line, making each individual tote work in unison as part of a single system. At one intersection, a 4-way connector allowed for the final detail: a standard hose spigot.


The totes were now set in place and plumbed together. Each lid was unscrewed enough to let air escape—eliminating airlock and allowing them to fill from the bottom, up through their outlets. All totes were covered with a weather resistant cover to reduce algae growth, secured around the plumbed manifold.
Next came time to finally begin diverting rainwater from the downspouts to our totes. Now, I literally had years to research and brainstorm about this part, but we still felt like mad scientists, with a maze of funnels and beakers or we were creating a Rube Goldberg just to get water into the tanks. It ended up still being a fair amount of trial and error, but we eventually figured out exactly how to accomplish our goals. The easiest way to explain what we did is to show you step by step, starting at the building’s gutters.
Our building sits in a large clearing, leaving our gutters relatively debris free. We initially considered installing gutter guards to act as our first line of mechanical filtration; however, after thinking about the existing propensity for gutter overflow during heavy rains, we decided any additional barrier to slow water flow into the gutters could potentially do more harm than good. Instead, we settled for a good, old-fashioned gutter cleaning.

Ok, so maybe it wasn’t quite “old-fashioned,” but we’re not exactly the type to voluntarily ascend a ladder, sixteen feet in the air, set on unstable ground. This telescoping brush keeps us down to Earth, so to speak.
The next step was to divert the downspouts to the IBC totes. There are innumerable ways to do this. We thought through countless iterations of this step and opted for something simplistic. Because Iowa’s winters go sub-zero, we need to be able to transition our collection system back to the normal downspouts at the end of fall or when the tanks are full. We also wanted little to no angles/bends in the collection route because that could slow the flow of water and further back up drainage off the roof, which could in turn worsen overflow from the gutters.
I’m a total science and math nerd, so I have to give you a glimpse of how this all came to fruition. Because our large, metal building only has two gutter downspouts, they’re the larger 3 x 4 dimension…that’s a cross-sectional area of 12 square inches. I’ve seen a lot of people use two inch diameter PVC to funnel water from the gutters into their tanks; the cross-sectional area of two inch PVC is just over 6.25 inches, nearly half of the downspout itself. I couldn’t in good conscience reduce the runoff that significantly. Keep in mind, the cross-sectional area of four-inch diameter pipe is more than 12.5 inches. Here’s what we came up with.

We cut out a section out of each of the building’s downspouts and installed a “y” diverter; it has a lever to switch the water’s route in one of two directions.

In one direction, the water would flow through a zigzag section of gutter, back to midline, and straight down the normal downspout from there. This will be the route we use for winter or when the totes are full. When routed in the other direction, we installed a downspout adaptor, which slips on to the 3×4 section of gutter on one end and snaps on to 4” corrugated drainage pipe on the other end. We’ll use this direction for collecting rainwater in our totes.

From the corrugated drainage pipe, we took the lower end and covered it with a 7” diameter, 200 micron filter bag with drawstring. This is the first real line of mechanical filtration in an attempt to keep the water in the totes as clean as possible and our regular maintenance less cumbersome. These bags can be regularly emptied of debris and washed. They’re typically used as aquarium filters, so they’re made to handle large flows of water.

At this point, I MacGyvered a “lid” to both support and secure the drainage pipe over the IBC tote opening AND block the rest of the opening to light, debris, mosquitoes, and other bugs. This included the use of a silicone kitchen mat and bungee cords. Makes perfect sense, right?

At this point it was May 2025, and a forecasted nice, little rainstorm had lit the fire to get that first downspout plumbed to the tanks; it would be a good, initial test of the system.

We ended up getting about half an inch of rain that first night, and we anxiously headed down to the property to see if our hard work paid off, if our system worked, if our plans were the right plans, if the totes weren’t compromised in some way, if our gamble of completing our two year project start to finish without testing individual components was the right move, etc. No pressure, right? To top it off, a major storm the next night was predicted, and we had lofty goals of completing the second downspout diversion to the tanks before it hit.
Drumroll, please!
The good news: there was about 20 gallons of water in each of the 12 tanks! The bad news: one of the tanks had a small but steady leak. We shut all the tanks off and isolated the tank with the leak. We determined the small stream was coming from the tote outlet-to-adapter junction. That was my first faceslap moment: that adaptor was one that came with one of the free tanks we got; it wasn’t one of the new ones I had purchased for the system.
We loosened the flexible connector to the tote and unscrewed the adaptor set to find the o-ring had failed. Although I clearly should’ve used a new one from the start, this was at least fixable. But in diagnosing this problem, I created a new one: when I was prying out the threaded adaptors, I cracked the PVC tee.

We quickly put our thinking caps on, cut out the section with the cracked tee, put a new threaded adaptor (with a new o-ring) on the tote, cut a few short sections of pipe, cemented them into a new tee, and spliced the replacement section in with 2 flexible PVC couplers. Surprisingly—and so fortunately—we had all those things on hand.

Next, we reopened all the tanks to make sure the plumbing manifold was water-tight along the whole stretch of totes. And we then FINALLY got to work on the intended project of the day: plumbing the west side downspout into the bank of totes. We repeated the same process as the day before; however, the terrain on the west site of the building is significantly more uneven—a problem that became far more apparent the very next day—and required a bit more ingenuity and bravery.

Additionally, the prior night’s rain had left the ground soft and incredibly muddy; however, we soldiered on and repeated the prior day’s process—more or less—on the west downspout diversion.

Now that the rainwater collection system was complete, it was going to be put to the test. The following 24-36 hours forecasted anywhere from 1.5” to a whopping 6” of rain. With the thought of all 12 collection tanks being at maximum capacity (plus some), I quickly ran through some doomsday scenarios (i.e., what would be the most likely element to fail and why?).
The PVC plumbing manifold that connected all the tanks together runs more than 30 feet in length and has an incredible number of connections; it’s also subjected to the highest amount of pressure, because it’s at the bottom of all the tanks. I became concerned that that manifold could need some additional support. When I thought about how to support pipes, I instantly envisioned the ceiling of our unfinished basement; many pipes are literally held up by pipe straps secured to the floor joists. So we picked up a few rolls of pipe strap and secured the plumbing manifold back up to the cage of each IBC tote.

We then closed down the zippers on the tote covers as much as we could and got out of there about 20 minutes before the rain hit.


The next morning came, and we didn’t yet know how much rain actually fell during that storm, nor did we have any idea how our structure fared through it all. Were we going to see an intact system of full tanks? Or a busted manifold and thousands of gallons worth of water-fueled erosion?
We had to swing by the property the next day to survey the damage. To our surprise, the pond level had risen by nearly three feet, and the habitats were still standing. Water continued to pour into the pond through the sediment basin drain, and some of our fears were alleviated. When we made it up the hill to our building, we peeked at the rain gauge.

So, here’s the rest story. Warning: this isn’t for the squeamish or faint of heart. We went two steps forward and one step back—a phrase we use all too often in healthcare with our patients. Yes, all twelve IBC totes were full. We had over 3,000 gallons of clean rainwater stored. The bad news is that two of our racks started to sink and tilt with the deluge of water.


We acted quickly. We closed all 12 tanks, diverted the gutters back to their traditional downspouts, and purged the PVC plumbing of retained water.
The flexible couplers saved our butts here. Things shifted but didn’t break; however, we didn’t want the plumbing manifold on the sinking racks to bust the manifold on the intact tanks/racks. I made the decision to separate the system. I cut the connection between tanks six and seven.

The next plan of action is to drain the 1,600 gallons of collected water from the west bank of totes into the pond. Once emptied, we can remove those six totes and repair the two racks on the west side. My suspicion is that we may need to add concrete footers at a much deeper depth, but that won’t be as pressing considering how much water we still have stored at the ready.
Surprisingly, we didn’t find this setback as frustrating (or even heartbreaking) as we would have thought. Our plumbing between the totes worked, our method of getting water from the gutters into the tanks worked, and we have a ton—multiple tons, technically—of water stored to get our trees through whatever this summer and fall have in store for us. We learned what the weakest link in our plan was, and we’ll learn how to fix it for the future. We’ll have all the kinks worked out before we establish our giant garden that will need to be watered every day, and we’ll do another post about rebuilding the west side water collection when we get around to remedying it. In the meantime, here’s to all the homesteaders out there who have a to-do list longer than they’ll ever have enough time for. Cheers!!
Leave a Reply