
Not everything we do goes as planned.
While I could just provide updates to some of our previous project pages, I believe we’ve had enough struggles to warrant a separate post. And in the spirit of full transparency, I want to share some of the things that didn’t work and what we did to try to fix them…repeatedly.
Remember that gorgeous guardrail we had installed on either side of the driveway to the house? Well after just a couple rainstorms, we had a TON of settling.


Luckily,—upon our request—the guardrail installer came out, refilled all the postholes, hydraulically raised the sunken posts, and installed braces to help maintain the correct height through a few seasons.

This one is remedied for now, but we were told to expect more settling that may require correction in the next couple years.
Ok, this next one is a doozy. It’s still a massive thorn in our sides, and it will be until our pond is full. Those perfect, wonderful fish habitats? They’re wreaking havoc on my sanity. The weather has been completely ravaging them over, and over, and over again. With every rain or strong winds comes more toppling. We’ve had to reset those habitats at least a dozen times. We’ve tried countless interventions to keep them upright, to no avail. Many of the taller habitats have floats built in, so they’re supposed to stand themselves up as the water level rises, but what kind of Type A, obsessive-compulsive, control freak with a medical background would I be if I just believed that?!

With the time, energy, and financial investments we made in those habitats on the line, it’s been constantly on our minds. We cannot allow all that to end up as a trash heap at the bottom of the pond. So we kept trying. And by definition, it was driving us insane—we kept doing the same things and somehow expected different results. I even offered some unsolicited future design changes to the habitat makers.
All the things we had been doing weren’t working. So I finally decided to try to tackle this from a different angle. Why? Why was the habitat bank eroding so badly and the other banks were fine? I admit, my first answer to that question was: I must be getting punished for something. But then I got serious and realized that with the majority of the house site cleared, water runs unobstructed down that very steep hill, picking up momentum as it goes. The other steep bank still has trees and ground cover to slow the flow of water, but not the hill above the habitat bank.
So the new mission was to focus on how to slow the water runoff down that hill before it reached the habitats; there was no point to keep propping them back up until we tried to fix the root of the problem uphill—literally! So I suppressed my inner Type A, obsessive compulsive control freak, ignored the toppled habitats, and got to work. I started with a dozen or so silt socks (erosion control wattles) and lined the crest of the habitat bank to provide some kind of barrier to torrential water flows down the hill hitting the habitats with full steam. Then, I laid down a row of jute blankets just below the silt sock. That serves to further slow the flow of water and hold prairie seed on the bank, above the future water line. If I can get prairie to root on the bank above the habitats, I’ll have another natural barrier to the flow of water down the hill.

Those silt socks were disgusting, by the way. Many of them had families of mice nesting inside—alive and dead, they were heavy and smelly, mildly wet (steamed up our cars from the inside), and left fine pine dust particles ALL OVER our vehicles and everything else, really. Moving those suckers around was not fun, but they appear to be of significantly better quality and will last longer than the straw wattles we’ve used elsewhere.
With my first intervention finally installed, we went further. In trying to establish prairie in our future front yard (just above the habitat bank), we’d need additional measures to keep seed where we put it and not just wash right down to that line of silt socks. We spread more seed and covered it with several more rows of jute blankets in an attempt to further slow water runoff and hold the seed in place long enough to take root.

Next came the third phase of Operation: Save the Habitats. We’re obviously trying to establish prairie in our future front yard (and remedy the constant cycle of fish habitat destruction and repair), so we want that area OFF LIMITS to future contractors. We knew we wanted to fence off the front yard before construction begins on the house anyway, so I figured out a way to solve two problems at once…hopefully.
Have you heard of silt fences? Because I know you’ve seen them. They’re often used during construction—especially along interstates—as a temporary erosion control measure. They’re designed to help control the flow of water, all while keeping the dirt where it is. Sounds like exactly what I need, right?

I decided on two runs of silt fencing: one run would cordon off the front yard and would remain until our home construction was complete, and the other run would divide the house clearing in hopes of further slowing the flow of water through that barren area until construction begins. For what it’s worth, we also seeded the cleared house site with rye for temporary coverage, but we still needed the fence to try to keep the seed in place.

Sounds easy enough. Spoiler alert: nothing we do ever seems easy, and this was no different. The proper way to install silt fences is to first dig a trench, as the fabric part of the fence needs to be buried below ground in order to keep dirt in place and be effective. Our rock hard clay isn’t typically amendable to digging two 100 foot-long trenches.
We had a narrow window of time. Several days before, we had a day-long gentle, soaking rain turned blizzard that dumped several inches of snow. It quickly warmed up into the 70s, and melted the snow. The ground was hydrated but not mud. In the following days, we had a major rainstorm predicted. We needed to get those fences in before the next torrent of water headed the habitats’ way. Miraculously, the ground was diggable! The drawback? The temps had dipped into the 30s with winds in the 20 mph range just for our two day working window. Lovely.
We bundled up and hand dug those two one-hundred foot long trenches about eight inches deep along our preplanned tiers.

We then hammered the fences’ stakes into the trenches, pulled the lower edges of the fabric down into the trenches, and refilled the trenches along both sides of the fences with soil.

That was just the start of the work. We then had to pull the fallen habitats out of the water, lay them on the bank, and devise a new plan for securing them upright under the rising water. While I mulled over our next steps, we had a storm that dropped 1.75” of rain. It was a big test of the new silt fences, and it was largely a success. We found three areas in the front yard where large amounts of water runoff could use some additional slowing, so we added an extra silt sock barrier at two of those points and extended a run of the silt fencing at the third.

Then came time to address the toppled habitats…AGAIN. Over the last eight months or so, we’ve learned a lot about what doesn’t work. The original 8” PVC stakes we used to “secure” the habitat bases were too short. Much of the bank had eroded away around those stakes, rendering them useless. Those that did stay in the bank often just gave way once the banks became soft and wet and the winds picked up.
Our attempt at securing the large tree habitats with long sections of PVC pipe and zip ties wasn’t a bad one, but the 12 foot tall tree habitats succumbed to the winds time and time again. We don’t want a ton of PVC pipe debris littering the bottom of our pond, nor was that repair attempt successful enough to try on the smaller habitats.
New plan: utilize wooden dowels, cut into to 2’ lengths around the habitats in order to try to stabilize them in an upright position through fill. The thought behind the 2’ lengths was that we could hammer about 8” into the bank and still leave more than a foot above ground to better stabilize the habitats and anchor the bases in the upright position. By utilizing wooden dowels, we gained more rigidity with smaller diameter than PVC, and the wood would decay and disappear over time, hopefully eventually leaving no trace of its existence.
With a new—and adequately different—plan at the ready, we got to work. We tried to focus first on the lower row of habitats, as they were quickly becoming submerged and presented with some urgency to their stabilization. Then, we turned to those habitats that were so unstable, their toppling continued to knock down other habitats below. Then we waited. Why invest the time and energy on every habitat if this intervention wasn’t going to work either? We experimented on the most vulnerable, and we needed to see if the trial would be a success.

We decided that smaller, more frequent trips down the bank to tinker with unstable habitats was more worth our time. Why spend 8 hours one day trying to re-secure a hundred habitats that Mother Nature is just going to toy with at every turn? Instead, we spent a couple hours here and there tending to a handful of habitats in clear and present danger each time. This has been—and will continue to be—an ongoing exercise in patience and persistence until the very tip of the last habitat disappears under water. And while it’s the complete antithesis to my “do something once and move on” approach, we’ve learned it’s just what’s required here.
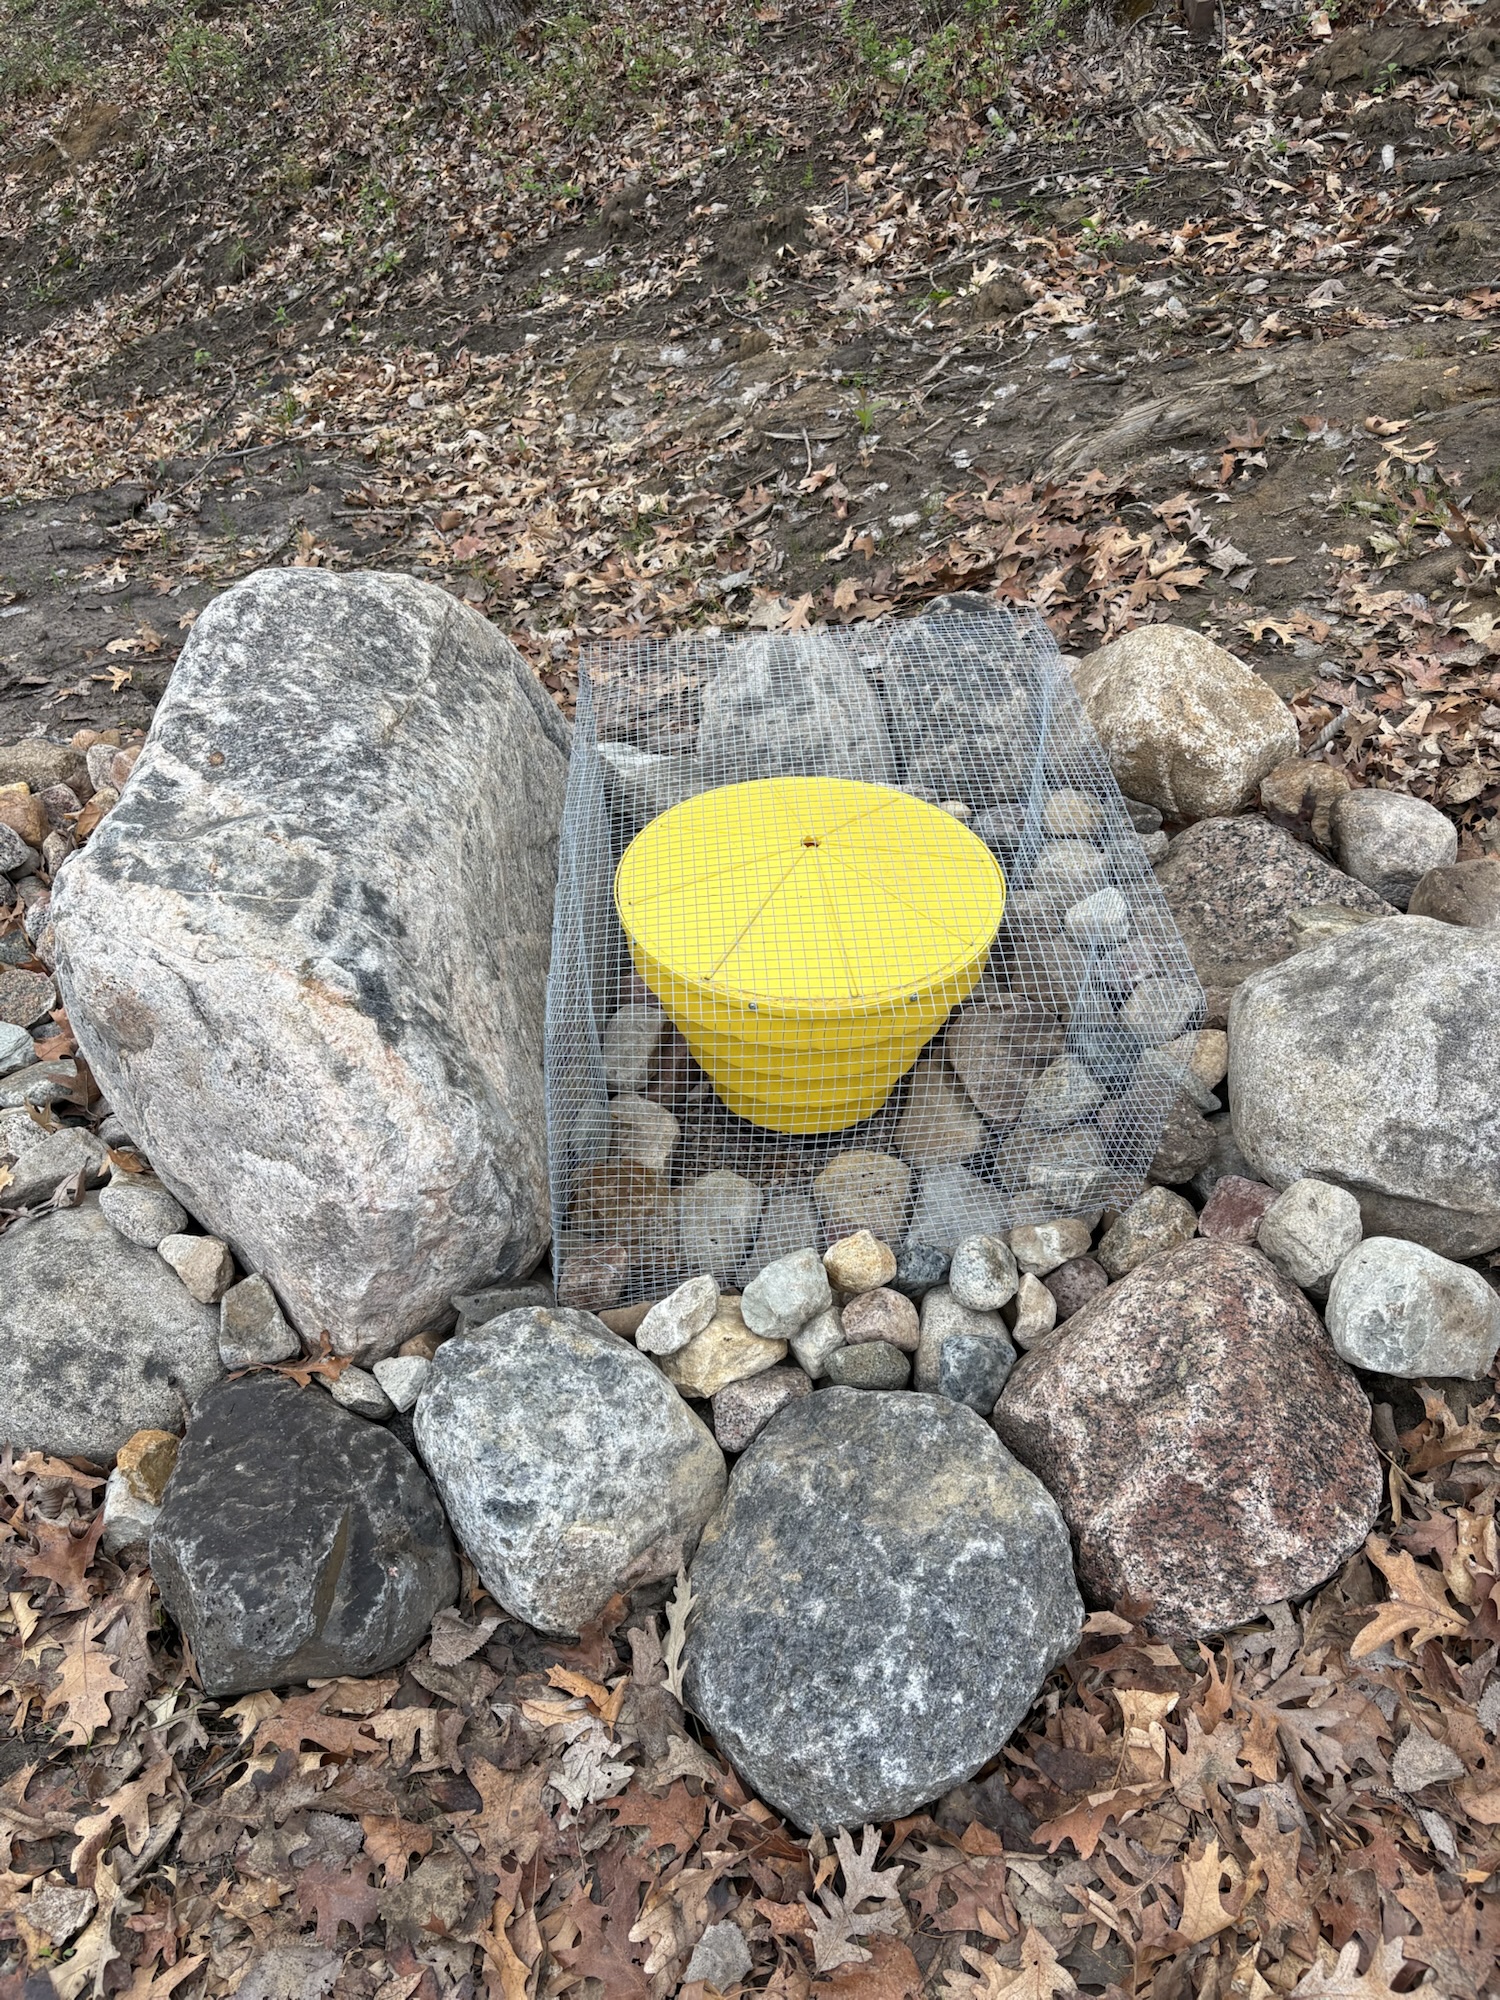
Now, I’ll tell you: compared to those damned habitats, everything else is just small potatoes. But we’re not immune to failure, so here’s another one. Remember the rock feature we created around the main pond drain to help keep debris from clogging it?

You know what they say about best-laid plans: they often go awry. Here I was, thinking I had built a debris screen, but instead what I had constructed was a debris trap. That pile of rocks quickly became a pile of leaves. As the wind blew all of our falling leaves across our property, this was the perfect spot for them to stop and stay put. It didn’t matter how many times we cleared the leaves away, more just found their way to this spot. To be fair, leaves collecting around this drain isn’t a big deal right now, nor will it be for quite some time, as we have about 10-11 feet of pond depth yet to fill. BUT we can’t have the main pond drain be constantly covered with wet leaves, as that would defeat its purpose entirely.
So I began thinking about what could permanently keep leaves away from the drain without needing constant maintenance from us, and I kept coming back to a cage. If I could build a wire cage around the drain, water could pass through, but leaves and other debris would stay out.
In January of 2025, I began constructing said drain cage.

I used 1/2” wire mesh (hardware cloth) to try to find the right combination of flow and screening. After three months of occasional, sporadic work on the cage, it was finally ready for installation. Of course, the installation required us to move around and adjust the river rock and surrounding boulders, because we couldn’t make it too easy on ourselves, you know.

After a few days of wind, we’ll be able to test its efficacy at keeping leaves away from the drain, but we’re going to call the fix to this unforeseen problem done for now.
Not everything we do works as intended, nor does every problem we encounter get fixed with one attempt. We learn and adapt through our failures, and we apply those lessons to future projects we take on. We’ll keep sharing the good, the bad, and the ugly, and we hope to help others by passing on what we’ve learned.
It’s still early in the spring, and we have an ambitious list of projects on the docket that we want to share with you, so stay tuned and help us hope for rain!
Leave a Reply